
In our last article we discussed the importance of verifying your drop data with real shooting. We’ve also covered topics about bullet selection, reloading, ballistic compensation, and long range rifles, in the past. It’s now time to discuss how to compensate for the long range shot. This is a lengthy topic, so we will split it into two parts: reticles and turrets. In this article we will examine Ballistic Compensating Reticles, the different types available, how to use them, and what their limitations are.
Lets first try to understand why Drop Compensating Reticles (DCR) were developed. Essentially, without compensation, a hunter has to guess his holdover amount in inches. With a traditional duplex, a shooter soon finds an additional hold point for a certain range by using the step where the crosshair goes from fine to thick. Pretty quickly, custom reticles with dots on the crosswire became very popular. This is a sercvice that Premier Reticles was known for. And now etched glass reticles with dots, hashmarks, and grids are available. They all have the same idea in common—compensating ballistically by matching the holdover points for various distances. So, for example if the reticle has holdover points calibrated for 100, 200, 300, and 400 yards, a shooter just elevates to the new hold point for a given distance to make the shot. This is a much better system than just guessing a hold over amount. Hits are more likely when the shooter is holding a crosswire or dot exactly on the aimpoint instead of some arbitrary point over an animals back.
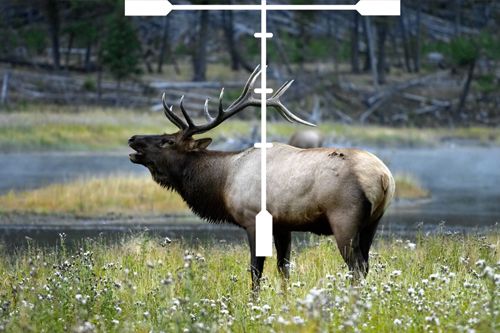
The holdover error ofr an elk at 625 yards with the flat shooting 7mm and a Burris Ballistic Plex.
Ok. We know that the DCR will help on get us on target, but the real trick is getting the reticle calibrated to our ballistics. Before we can do this, we need to know our True Ballistics, and we need to understand the subtension (spacing) and focal plane of our reticle.
In the last issue of Trophy Hunter Magazine, we went step by step through the process of using the online ballistics program atwww.gseven.com. This system was developed to allow the regular shooter to find his true ballistics with very little equipment. It does require some long range shooting to verify actual bullet drop. Once the True BC or muzzle velocity has been calculated, a drop chart can be generated that shows actual bullet drop in inches, Minutes of Angle, or clicks. Now its just a matter of applying this bullet drop information to the particular reticle system in use.
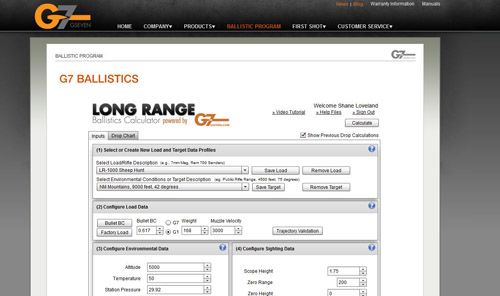
Use the BC calculator at www.gseven.com to get an accurate drop chart.
There are several different styles of reticles available. But no matter what style it is, the most important factor in using the reticle to match our ballistics is the focal plane the reticle is installed in. A front or first focal plane “fixes” the subtension (or spacing) of the scope, so as the magnigication power changes and the target gets bigger, the reticle magnifys at the same rate. A rear or second focal plane scope allows the relationship between the target and the reticle subtension to vary as the magnification power changes. Each method has its advantages and disadvantages, we will show you how to maximize either one.
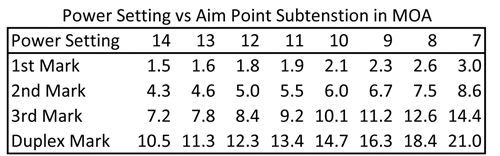
Drop subtension vs. magnification power setting on the Burris Ballistic Plex reticle.
Let’s setup a reticle for a front or first focal plane riflescope. This would be a Swarovski BR reticle or old TDS reticle or the NP-R1 in the new Nightforce 3.5-15X50 F1 or Darrel Hollands ART in a S&B. The NP-R1 reticle is very simple, and we will be able to make a good example of how it works. The NP-R1 reticle in the first focal plane will always subtend one minute of angle for every mark on the the vertical crosswire. Nightforce calls this the elevation bar. Now subtension means the coverage or the measurement between the marks. It gets bigger as the distance increases just like MOA, so if you have subtension or spacing of one MOA, it will cover or measure one inch at 100 yards, four inches at 400 yards, or nine inches at 900 yards, etc.
The NP-R1 reticle in the new NXS 3.5-15X50 F1 first focal plane rifle scope.
Now we could go through the trouble to make a chart that converts the marks to inches of drop, but it is much easier to build a drop chart that outputs the MOA correction for different ranges. If we go back to the program at www.gseven.com, and put in our True BC and velocity along with sight in conditions (lets use 100 yards) and altitude and temperature, we can output a drop chart in MOA. For our examination, lets use a 7mm Rem Mag case with a 168 VLD bullet right at 3000 fps muzzle velocity and a True BC of .648 in my gun. My range is at 4200 feet elevation and the temperature is about 50 degrees in the morning.
If I build my chart in 25 yard increments I can easily estimate the approximate range for each mark on the elevation bar. The cross hairs are zero, the first mark is about 188 yards, the second is 245, the third mark is 300, and the fourth about 346. We can apply this all the way out to 1000 yards where 21 marks is approximately 964 yards and 22 marks is about 996 yards. These numbers are very accurate, and I can expect the bullet impact to be right behind the mark if I am shooting at any of the corresponding ranges.
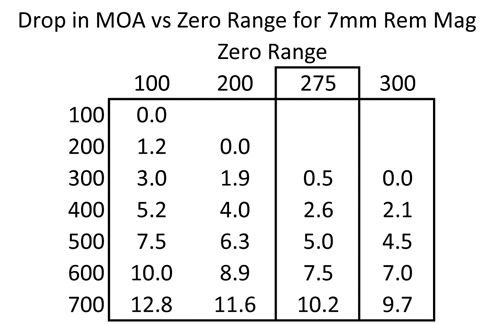
A 275 Yard zero makes the best long range fit with no more than four inches of error.
It is a very simple system, and it is easy to apply our True Ballistics information and build a diagram or chart to carry in the field. Personally, I have a hard time remembering the oddball ranges so it makes carrying a card or pocket computer necessary. Also, if you have a big change in your shooting conditions, lets say we go up on the mountain and the altitude is 10,000 feet and the temperature is 40 degrees, or you have a 15 degree incline you are going to need a chart that shows those conditions.
This is where a second focal plane reticle can offer an advantage. With a second focal plane reticle, as you change you magnification and the apparent size of your target increases or decreases, the apparent size of the reticle stays fixed. This means that the subtension or spacing relative to your target changes. On one had this makes things a little more complex, but it can also allow you to set the marks on your elevation bar to match an exact range. Then the requirement for carrying a card is negated. The price you pay is your reticle will only match your drop information FOR ONE POWER SETTING. If the power setting is changed, your marks will be off.
The set up on one of these scopes is a little different, and maybe a little more difficult. Some of the most popular models utilizing BDR’s and second focal plane reticles are the Leupold Boone and Crockett, the Burris Balistic Plex, and the Nikon BDC. Nightforce also makes some high end optics with second focal plane reticles. Lets look at the Burris Ballistic Plex and find an optimum calibration for our 7mm.
The first thing we need to do is determine how many MOA each mark subtends at high magnification. The Burris manual shows the drop in inches for 200, 300, 400 and 500 yards. A simple approximation for the MOA subtension is (Drop in inches) / 1.047 / (Drop distance in Yards/100) so 55.3”/1.047/5yds=10.5 MOA for the “500” yard mark on the reticle. The 400 would be 7.2 MOA, the 300 yard mark would be 4.3 MOA and the 200 yard mark is 1.5 MOA. Remember that these subtension amounts are typically referenced for the highest magnification setting. So using a Burris 4.5-14X42, the scope would need to be set on 14 for those MOA subtensions to be valid.
The benefit from converting to an MOA subtension is now the marks aren’t relative to range, just MOA compensation, and we can also now determine how the subtension changes with power. I would plug the data into Microsoft Excel and generate a regression line and a mathematical formula for subtension vs magnigfication, but I think that would bore most readers, so we will just use an iterative approach.
The Drop Values for the Burris Ballistic Plex reticle can be converted to Minutes of Angle.
Basically, we have 10.5 MOA of adjustment to the bottom mark at 14 power. You can measure this by aiming at a 100 yard target with one inch grids. From the center to the lowest mark will be just over 10 inches. If we comapare our drop chart against the reticle subtension and we manipulate the zero, we find a pretty good fit at 14 power with a 275 yard zero, because we need about 10.2 MOA’s between 275 and 700, but this is a very flat shooting cartridge. A slower cartidge and a lower BC may require setting the scope on a lower power. With this configuration, the cross hair is ok for any shot out to 350 and the first mark is for 400, then 500, 600 and 700 yards. The calibration error is no larger than 4” all the way through 700 yards.
Alright, we’ve done a pretty good job of setting up both types of focal plane reticles. The first focal plane method is more precise, but you have to use a chart to keep track of the oddball range numbers. The odd range numbers also make quick decisions for split ranges hard to calculate. For both focal planes, there is a potential for error when compensating the split ranges. With our flat shooting 7mm and a VLD bullet the error for 25 yards at a distance of 600 yards in almost one MOA or six inches! For a standard cartidge it could be twice as much. And it is a fact that guessing a hold point between aiming marks is less precise than holding right on the mark. Because of this reason alone, I would place a maximum hunting range with a long range cartridge at around 600 yards with this type of compensation (maybe 450 with a standard cartridge).
The last problem we need to overcome with holdover reticles is the windage compensation. My favorite holdover reticle is the Leupold Boone and Crockett because it has the 10 mph wind hold points built right in to the hold over marks. There are a few other systems that are similar. Most other systems require guesswork. That 10 mph wind would deflect our very efficient 7mm VLD bullet 18” at 600 yards. Even at intermediate ranges of 400 to 600 yards we still need to be aware of windage effects, and properly compensate for them or just try to get closer.
Bottom line. Calibrate your reticle to True Ballistics that have been verified in the field, and practice shooting at odd ranges and in wind conditions so that you can prove the effectiveness of your system, build your confidence, and know your limitations. A hunters ethic should dictate a one shot kill. In our next article we will cover the precise methods and equipment todays expert shooters are using to make precision shooting at extreme distances possible.